How to Effectively Use a Ceiling Tile Leak Diverter to Prevent Water Damage

Discover the importance of a ceiling tile leak diverter and learn how to effectively use this essential tool to protect your property from water damage caused by leaks and drips.
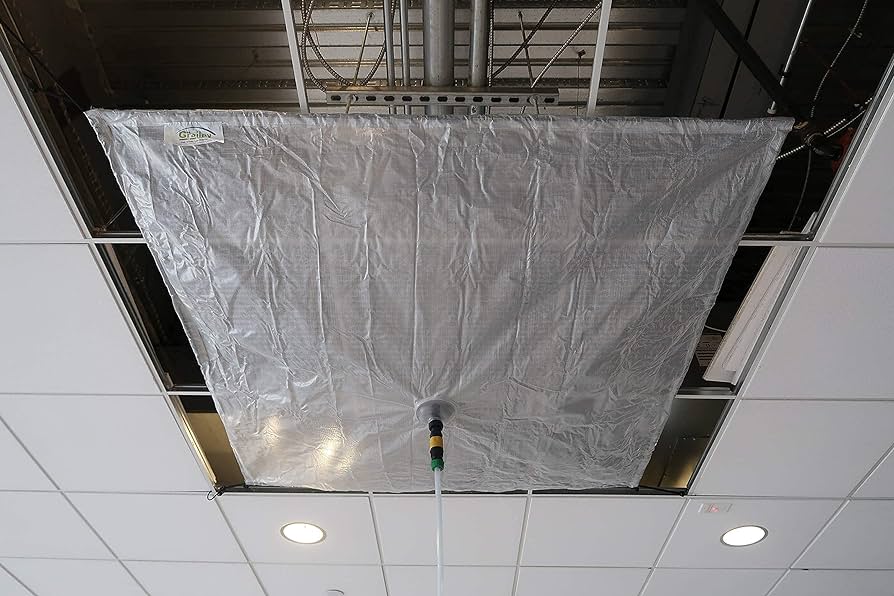
Ceiling Tile Leak Diverter

Introduction

Water leaks can cause significant damage to ceilings, walls, and other structures in your home or workplace. When it comes to addressing leaks from overhead sources, such as roof leaks or plumbing issues, a ceiling tile leak diverter is an invaluable tool for containing and redirecting water away from sensitive areas. In this comprehensive guide, we’ll explore the role of a ceiling tile leak diverter, how it works, and best practices for its use to prevent water damage and maintain the integrity of your property.

Understanding the Ceiling Tile Leak Diverter

A ceiling tile leak diverter serves as a specialized device designed to capture and redirect water from leaking ceilings to a designated drainage point. It consists of a durable tarp or plastic sheeting suspended from a frame, with a flexible hose or tubing attached to channel water away from the affected area. These diverters are available in various sizes and configurations to accommodate different ceiling layouts and leak severity.

The Role of a Ceiling Tile Leak Diverter

The primary purpose of a ceiling tiles leak diverter is to prevent water damage by containing and redirecting leaks away from sensitive areas. By capturing water before it has a chance to saturate ceiling tiles or penetrate underlying structures, a leak diverter helps minimize the risk of mold growth, structural damage, and costly repairs. Additionally, diverting water away from occupied areas helps maintain a safe and comfortable environment for occupants.

How Does a Ceiling Tile Leak Diverter Work?

A ceiling tile leak diverter works by positioning the diverter directly beneath the source of the leak and allowing water to collect in a designated catchment area. A flexible hose or tubing, attached to the diverter, channels the water and directs it to a drainage point, such as a floor drain or collection bucket. This process effectively prevents water from spreading beyond the affected area and provides temporary relief until permanent repairs can be made.

Using a Ceiling Tiles Leak Diverter: Best Practices

When using a ceiling tiles leak diverter, it’s essential to follow these best practices to ensure effective water containment and damage prevention:

  1. Identify the Source of the Leak: Before installing a leak diverter, identify the source of the leak and address any immediate concerns, such as shutting off water supply lines or patching roof leaks.
  2. Select the Appropriate Size and Configuration: Choose a leak diverter that is appropriately sized and configured to accommodate the size and severity of the leak and the layout of the ceiling tiles.
  3. Position the Diverter Correctly: Position the leak diverter directly beneath the source of the leak, ensuring that it covers the affected area completely. Secure the diverter in place using adjustable straps or hooks.
  4. Monitor and Empty the Catchment Area: Regularly monitor the catchment area of the leak diverter and empty it as needed to prevent overflow and ensure continuous water containment.
  5. Inspect and Maintain the Diverter: Periodically inspect the condition of the leak diverter and make any necessary repairs or replacements to ensure its continued effectiveness.

Conclusion

A ceiling tiles leak diverter is an essential tool for addressing water leaks and preventing water damage in homes, offices, and commercial buildings. By understanding its role, how it works, and best practices for its use, you can effectively contain leaks, protect property assets, and maintain a safe and comfortable environment for occupants.

Read too: Exploring the Efficiency of Radiant Ceiling Heater Electric: A Comprehensive Guide
Navigating Tenant Woes: Understanding and Addressing a Leaking Ceiling in a Rented Property

Dealing with a leaking ceiling in your rented space? Explore the complexities of “Leaking Ceiling in Rented Property” and learn how to navigate this common issue to ensure a prompt and effective resolution.

Leaking Ceiling In Rented Property

The Unwelcomed Drip: Leaking Ceiling In Rented Property

Uncover the causes, responsibilities, and steps to take when faced with a leaking ceiling in a rented property.

Identifying the Signs: Leaking Ceiling In Rented Property

Recognize the early indicators of a leaking ceiling and take proactive measures to address the issue.

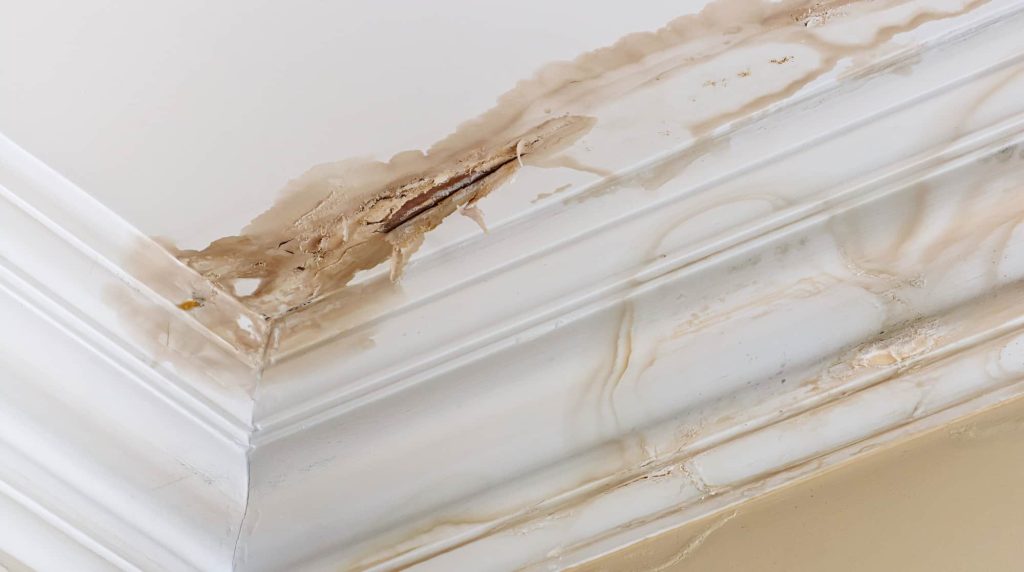
  1. Water Stains and Discoloration: Water stains or discoloration on the ceiling are telltale signs of a leak. Pay attention to any changes in the ceiling’s appearance.
  2. Dripping Sounds: Audible dripping sounds or the sensation of water droplets falling are clear indications of an active leak. Investigate the source promptly.
  3. Mold or Mildew Growth: Moisture from a leaking ceiling can lead to mold or mildew growth. If you notice these signs, it’s crucial to address the leak promptly to prevent further damage.

Understanding Responsibilities: Leaking Ceiling In Rented Property

Clarify the responsibilities of tenants and landlords when it comes to addressing a leaking ceiling in a rented property.

  1. Landlord’s Responsibilities: Landlords are typically responsible for structural repairs, including fixing leaks in the roof or ceiling. Contact your landlord immediately to report the issue and request repairs.
  2. Tenant’s Responsibilities: Tenants are responsible for notifying the landlord promptly about any signs of a leaking ceiling. Timely reporting helps prevent further damage and demonstrates a commitment to maintaining the property.
  3. Temporary Mitigation: In the interim, tenants can take steps to mitigate potential damage. Place buckets under active leaks, move belongings away from affected areas, and document the damage with photos for reference.

Resolving the Issue

Explore the steps to take when addressing a leaking ceiling, ensuring a swift and effective resolution.

  1. Report the Issue Promptly: As soon as you notice a leaking ceiling, report the issue to your landlord or property management. Provide detailed information about the location and severity of the leak.
  2. Document the Damage: Document the damage with photos and written descriptions. This documentation may be crucial for insurance claims or future discussions with your landlord.
  3. Allow Access for Repairs: Cooperate with your landlord or maintenance personnel to facilitate prompt repairs. Timely access to the property allows for a quicker resolution of the issue.

Preventing Future Leaks

Implement preventative measures to minimize the risk of future leaks and protect your rented property.

  1. Regular Inspections: Conduct regular inspections of your rented property to identify potential issues early on. This proactive approach can prevent minor leaks from escalating into significant problems.
  2. Communicate Effectively: Maintain open communication with your landlord. Report any signs of water damage promptly and work together to address and resolve issues in a timely manner.
  3. Tenant Insurance: Consider obtaining renter’s insurance to protect your personal belongings in the event of water damage. While it may not cover structural repairs, it can provide financial assistance for damaged personal property.

Conclusion: Resolving Leaking Ceiling Woes in Rented Properties

In conclusion, addressing a leaking ceiling in a rented property requires prompt action, effective communication with your landlord, and collaboration to facilitate repairs. By understanding the signs, responsibilities, and preventative measures, tenants can navigate this common issue and ensure a safe and well-maintained living environment. Remember, a leaking ceiling is not just a nuisance but a potential threat to the integrity of the property, making timely resolution essential for both tenants and landlords.