If you’re looking to elevate the aesthetic of your bathroom, consider installing a plank ceiling. This versatile design choice can bring warmth, texture, and a touch of luxury to your space. In this comprehensive guide, we’ll explore the benefits of a plank ceiling in the bathroom, the types of materials you can use, installation tips, and design inspiration to help you create a stunning bathroom transformation.
Why Choose a Plank Ceiling in the Bathroom?
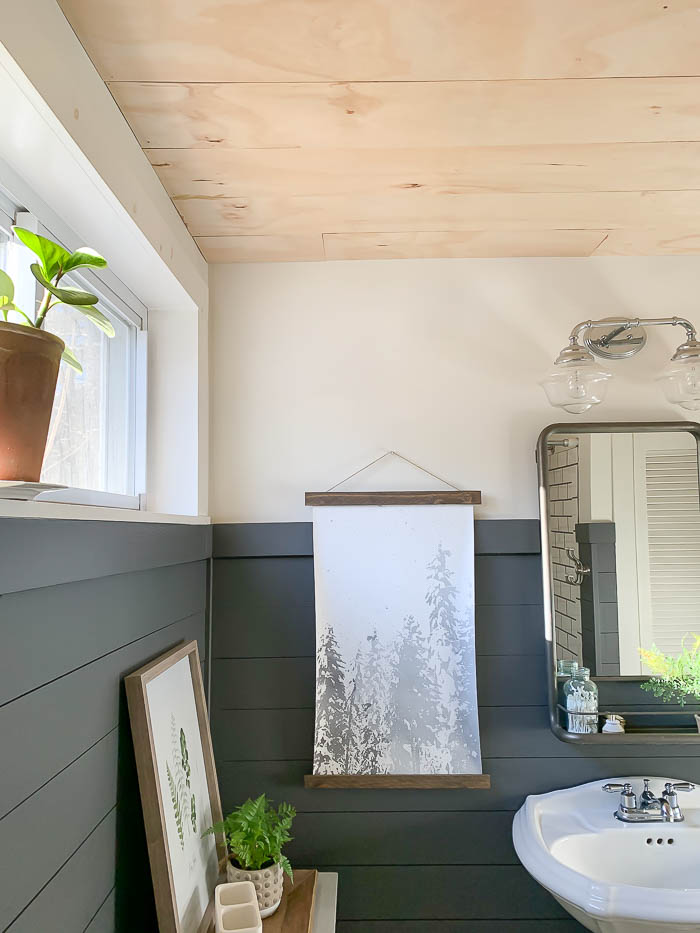
A plank ceiling in the bathroom can significantly enhance the overall look and feel of the space. Here are some compelling reasons to consider this design option:
Aesthetic Appeal
Plank ceilings add a natural, rustic charm to bathrooms, creating a cozy and inviting atmosphere. The wood texture contrasts beautifully with smooth bathroom surfaces like tile and glass, adding visual interest and depth.
Versatility
Plank ceilings can be tailored to fit any bathroom style, from modern and minimalist to traditional and rustic. You can choose from a variety of wood types, finishes, and stains to match your desired look.
Durability
When properly sealed and maintained, wood planks can withstand the humid environment of a bathroom. Using moisture-resistant materials ensures that your ceiling remains beautiful and functional for years to come.
Value Addition
A well-designed plank ceiling can increase the value of your home. It adds a unique and desirable feature that potential buyers may find appealing, setting your home apart from others.
Types of Materials for a Plank Ceiling in the Bathroom
Selecting the right materials is crucial for the success of your plank ceiling project. Here are some popular options:
Wood
Wood is the most traditional and popular choice for plank ceilings. Different wood types offer various looks and characteristics:
- Cedar: Naturally resistant to moisture and insects, cedar is a durable option for bathrooms. It has a pleasant aroma and a rich, warm color.
- Pine: A more affordable option, pine can be stained or painted to match your decor. It’s versatile and widely available.
- Teak: Known for its high oil content, teak is highly resistant to water and decay. It’s an excellent choice for a luxurious, long-lasting ceiling.
PVC
PVC planks are a practical alternative to wood. They are lightweight, easy to install, and resistant to moisture, making them ideal for bathrooms. PVC planks come in various finishes, including wood-like textures that mimic the appearance of real wood.
Composite Materials
Composite planks, made from a mixture of wood fibers and plastic, combine the best features of both materials. They are highly durable, moisture-resistant, and available in a range of styles and colors.
Installation Tips for a Plank Ceiling in the Bathroom
Installing a plank ceiling in your bathroom requires careful planning and execution. Here’s a step-by-step guide to help you through the process:
Step 1: Measure and Plan
Start by measuring the dimensions of your bathroom ceiling. This will help you determine how much material you need. Consider the direction you want the planks to run and the layout of any lighting fixtures or vents.
Step 2: Choose Your Materials
Select the type of planks you want to use and purchase enough to cover your ceiling area. Don’t forget to buy any additional materials needed for installation, such as nails, adhesive, and a vapor barrier.
Step 3: Prepare the Ceiling
Before installing the planks, ensure your ceiling is clean and free of any debris. If you’re installing over an existing ceiling, check for any damage or mold that needs to be addressed.
Step 4: Install a Vapor Barrier
Since bathrooms are prone to moisture, installing a vapor barrier is essential to protect your ceiling and the underlying structure. Attach the vapor barrier to the ceiling joists with staples or adhesive.
Step 5: Attach the Planks
Start installing the planks along one edge of the ceiling, making sure they are aligned and straight. Use nails or adhesive to secure each plank to the ceiling joists. If using nails, ensure they are countersunk to create a smooth surface. Continue this process until the entire ceiling is covered.
Step 6: Cut Around Fixtures
Carefully measure and cut planks to fit around any ceiling fixtures, such as lights or vents. Use a jigsaw or hole saw for precise cuts.
Step 7: Finish and Seal
Once all the planks are installed, apply a sealant to protect the wood from moisture. Choose a sealant that is suitable for bathrooms and follow the manufacturer’s instructions for application.
Design Inspiration for Your Bathroom Plank Ceiling
A plank ceiling can dramatically transform your bathroom’s look and feel. Here are some design ideas to inspire your project:
Coastal Retreat
Create a serene, beach-inspired bathroom by using light-colored wood planks, such as white-washed pine or bleached cedar. Pair the ceiling with soft blue or seafoam green walls, and add nautical accents like shells, starfish, and wicker baskets.
Rustic Charm
For a warm, rustic bathroom, choose rich, dark wood planks like walnut or teak. Complement the ceiling with stone or brick accents, wrought iron fixtures, and cozy textiles in earthy tones.
Modern Minimalism
Achieve a sleek, modern look by using smooth, evenly finished planks in a light or neutral color. Pair the ceiling with minimalist fixtures, clean lines, and a monochromatic color scheme to create a sophisticated, contemporary space.
Traditional Elegance
For a classic, elegant bathroom, opt for medium-toned wood planks with a refined finish. Complement the ceiling with traditional fixtures, such as brass or gold accents, marble countertops, and vintage-inspired accessories.
Maintenance Tips for Your Plank Ceiling in the Bathroom
Proper maintenance is crucial to keep your plank ceiling looking beautiful and functioning well. Here are some tips to help you maintain your ceiling:
Regular Cleaning
Dust and clean the ceiling regularly to prevent dirt and grime buildup. Use a soft cloth or duster to gently remove dust. For more thorough cleaning, use a damp cloth with mild soap and water. Avoid harsh chemicals that could damage the wood or finish.
Monitor for Moisture
Keep an eye on the humidity levels in your bathroom. Use a vent fan or dehumidifier to reduce moisture and prevent mold and mildew growth. Check the ceiling periodically for any signs of water damage, such as discoloration or warping.
Reseal as Needed
Over time, the sealant on your wood planks may wear off. Reseal the ceiling as needed to maintain its moisture resistance. Follow the manufacturer’s recommendations for reapplication and ensure the bathroom is well-ventilated during the process.
Address Damage Promptly
If you notice any damage, such as cracks or chips, address it promptly to prevent further deterioration. Small repairs can often be done with wood filler and touch-up stain or paint. For more significant damage, you may need to replace individual planks.
Conclusion
Installing a plank ceiling in the bathroom is a stylish and practical way to enhance your space. With various materials and design options, you can create a bathroom that reflects your personal style and adds value to your home. By following the installation and maintenance tips provided in this guide, you can enjoy a beautiful and functional plank ceiling for years to come. Whether you’re aiming for a rustic retreat, a modern oasis, or a traditional sanctuary, a plank ceiling can transform your bathroom into a truly special space.
Read too: Understanding and Dealing with Ants in the Ceiling Spaces: Navigating the Intrusion