How To Wire Ceiling Speakers To TV? Setting up a home theater system with ceiling speakers can elevate your audio experience to new heights, offering immersive sound quality that enhances your movie nights and music listening. Wiring ceiling speakers to your TV may seem complex, but with the right instructions and tools, you can achieve a seamless setup. This comprehensive guide will walk you through the process of connecting ceiling speakers to your TV, ensuring you get the best audio performance from your home entertainment system.
Understanding the Basics of Ceiling Speakers and TV Connections
Before diving into the wiring process, it’s crucial to understand the basic components and connections involved:
1. Ceiling Speakers
Ceiling speakers are designed to be installed in the ceiling, providing an unobtrusive audio solution that distributes sound evenly throughout the room. These speakers can be part of a home theater system or a multi-room audio setup.
2. AV Receiver
An AV receiver acts as the central hub for your audio and video equipment. It processes audio signals and sends them to your speakers. In most setups, the receiver is the component that connects to your TV and ceiling speakers.
Read too: Kitchen Lighting For A Vaulted Ceiling: Illuminating Your Space with Style and Functionality
3. TV Audio Output
Your TV will have audio output options such as HDMI ARC (Audio Return Channel), optical audio out, or analog audio out. These outputs are used to send the audio signal from your TV to the AV receiver.
4. Speaker Wire
Speaker wire is used to connect the ceiling speakers to the AV receiver. It typically consists of two conductors (positive and negative) that carry the audio signal.
How to Wire Ceiling Speakers to TV: A Step-by-Step Guide
Wiring ceiling speakers to your TV involves several steps, from preparing your equipment to making the physical connections. Follow this detailed guide to ensure a successful setup:
1. Gather Your Tools and Materials
Before you begin, make sure you have the following tools and materials:
- Ceiling speakers
- AV receiver
- Speaker wire
- Wire strippers
- Screwdriver
- Electrical tape
- Drill (for mounting speakers)
- Wall plates (optional, for a cleaner look)
2. Plan the Speaker Placement
Decide where you want to install your ceiling speakers. Ideal placement typically includes:
- Symmetrical positioning: Place the speakers equidistant from the main listening area for balanced sound.
- Avoiding obstructions: Ensure that the speakers are not obstructed by furniture or other objects.
- Spacing: Maintain a distance between the speakers to create a surround sound effect.
3. Install the Ceiling Speakers
Follow these steps to install your ceiling speakers:
- Mark the installation points: Use a pencil to mark the locations where you will install the speakers.
- Cut the holes: Use a drywall saw or a hole cutter to make holes in the ceiling for the speaker mounts.
- Run the speaker wires: If you haven’t already, run the speaker wires from the location of your AV receiver to the speaker installation points. You may need to fish the wires through the walls or ceiling.
- Mount the speakers: Insert the speakers into the holes and secure them according to the manufacturer’s instructions. This often involves tightening screws or using clamps.
4. Connect the Speaker Wires to the Ceiling Speakers
Once the speakers are installed, connect the speaker wires to the ceiling speakers:
- Strip the wires: Use wire strippers to remove about 1/2 inch of insulation from the ends of each wire.
- Connect the wires: Attach the positive wire (usually marked with red) to the positive terminal on the speaker and the negative wire (usually marked with black) to the negative terminal. Make sure the connections are secure.
5. Connect the Speaker Wires to the AV Receiver
Next, connect the other ends of the speaker wires to the AV receiver:
- Strip the wires: As before, strip about 1/2 inch of insulation from the ends of the speaker wires.
- Connect the wires: Attach the positive wire to the positive terminal on the AV receiver and the negative wire to the negative terminal. The receiver will have separate terminals for each speaker, so ensure you connect each wire to the corresponding terminal.
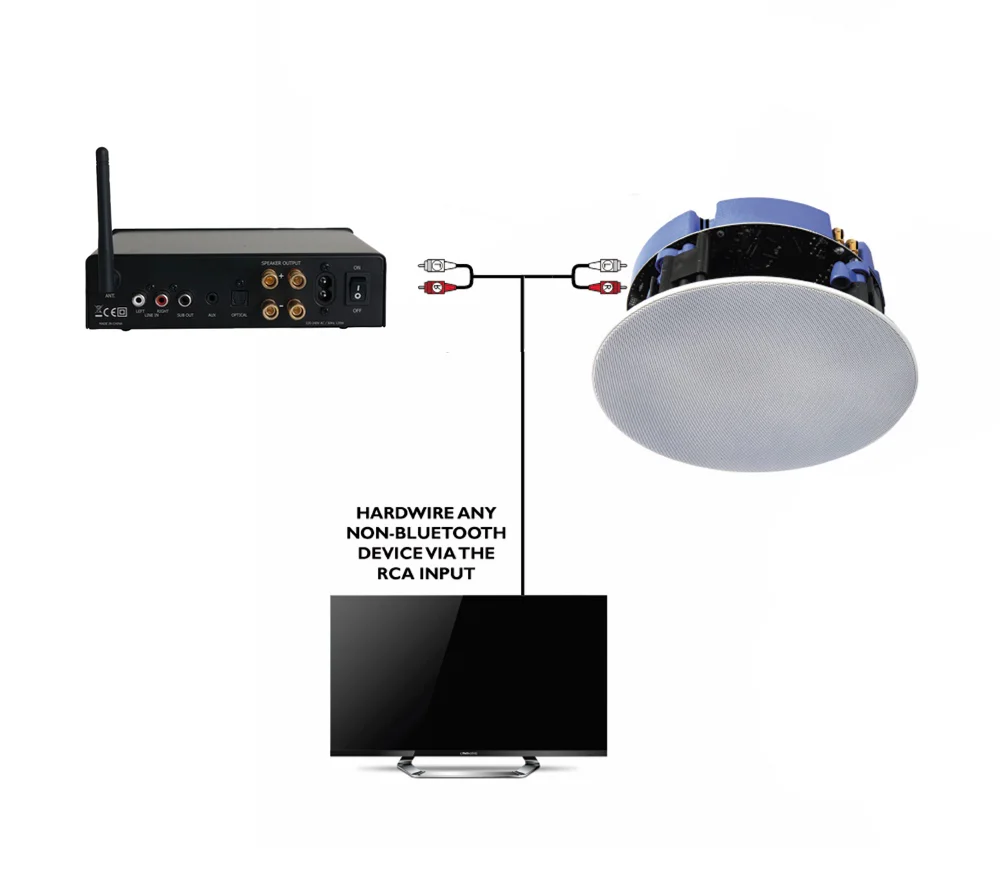
6. Connect the TV to the AV Receiver
To get audio from your TV to the AV receiver, make the following connections:
- Identify the audio output: Locate the audio output on your TV. This could be HDMI ARC, optical audio out, or analog audio out.
- Use the appropriate cable: Connect the TV’s audio output to the corresponding input on the AV receiver using the appropriate cable (HDMI, optical, or RCA).
- Configure TV settings: Set your TV’s audio output to match the type of connection you used. For HDMI ARC, ensure the feature is enabled in your TV’s settings.
7. Test the Setup
Once all connections are made, test your setup:
- Power on the system: Turn on your TV, AV receiver, and ceiling speakers.
- Select the input source: Choose the appropriate input source on your AV receiver (e.g., TV audio).
- Play audio: Play some audio or video content on your TV and check if the sound is coming from the ceiling speakers. Adjust the volume and balance settings on the AV receiver as needed.
Troubleshooting Common Issues
If you encounter issues with your setup, here are some common problems and solutions:
1. No Sound from Speakers
- Check connections: Ensure all speaker wires are properly connected and that there are no loose connections.
- Verify receiver settings: Make sure the AV receiver is set to the correct input source and that the volume is turned up.
2. Distorted Sound
- Inspect wires: Check for any damaged or frayed wires and replace them if necessary.
- Adjust settings: Verify the speaker settings on the AV receiver and make sure the audio balance is properly adjusted.
3. Speakers Not Working
- Test individual speakers: Try connecting each speaker to a different channel on the AV receiver to determine if a specific speaker is faulty.
- Check receiver output: Ensure the AV receiver is functioning correctly by testing with other speakers or components.
Maintaining Your Ceiling Speakers
To ensure the longevity and optimal performance of your ceiling speakers, follow these maintenance tips:
1. Regular Cleaning
Dust and clean the speaker grilles periodically to maintain clear sound quality. Use a soft cloth or a vacuum with a brush attachment.
2. Inspect Wires
Check the speaker wires regularly for any signs of damage or wear. Replace any damaged wires to prevent audio issues.
3. Check Connections
Ensure that all connections are secure and that there are no loose or corroded terminals.
Conclusion
Wiring ceiling speakers to your TV is a great way to enhance your home entertainment system with high-quality audio. By following the steps outlined in this guide, you can achieve a professional setup that delivers immersive sound. Remember to carefully plan your installation, make secure connections, and test your setup to ensure everything is working correctly. With the right approach, you can enjoy an exceptional audio experience right in your own home.