Ceiling Fan Installation Red Wire. Ceiling fan installation can be a breeze if you know the ropes. One aspect that often perplexes DIY enthusiasts is the enigmatic red wire. In this guide, we’ll delve into the intricacies of ceiling fan installation, with a spotlight on the elusive red wire. Whether you’re a novice or a seasoned DIYer, understanding how to navigate the red wire can make your installation project smoother and more successful.
Introduction: Ceiling Fan Installation Red Wire
Ceiling fans are a popular addition to homes for their ability to circulate air efficiently, providing comfort and cost savings on energy bills. However, the installation process can be daunting, especially when confronted with wires of various colors. Among them, the red wire stands out as a potential source of confusion.
Demystifying the Red Wire
Understanding the Basics
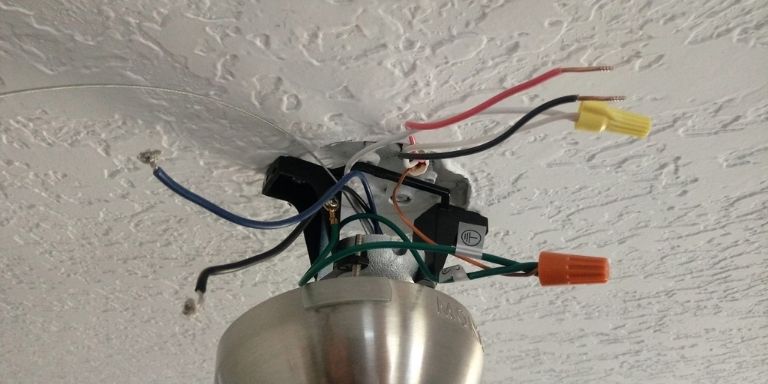
The red wire in a ceiling fan installation is typically associated with the fan’s light kit. It plays a crucial role in supplying power to the lighting fixture. While the standard color-coding for wires is black for the fan and blue for the light, the red wire can sometimes be used for either function, depending on the manufacturer’s specifications.
Identifying the Red Wire’s Purpose
To decipher the purpose of the red wire in your ceiling fan, consult the manufacturer’s manual. In most cases, it serves as the power supply for the light kit, allowing you to control the fan and light separately with dual switches.
Ceiling Fan Installation: Step by Step
Step 1: Gather Your Tools
Before diving into the installation process, ensure you have all the necessary tools on hand. These may include a screwdriver, wire stripper, voltage tester, and pliers.
Step 2: Turn Off Power
Safety first! Turn off the power to the circuit you’ll be working on to avoid any electrical mishaps. Use a voltage tester to double-check that the power is indeed off.
Step 3: Mount the Fan Bracket
Follow the manufacturer’s instructions to mount the fan bracket securely to the ceiling. This step is crucial for ensuring the stability of your ceiling fan.
Step 4: Connect the Wires
Identify the wires coming from your ceiling and those from the fan. Match the colors – black to black, white to white, and if applicable, red to red. Secure the connections with wire nuts.
Navigating the Red Wire: A Closer Look
Understanding Dual Switch Wiring
For situations where you want independent control over the fan and light, a dual switch setup is essential. The red wire, in this case, will be connected to one of the switches, allowing you to control the light separately from the fan.
When to Consult a Professional
If you find the wiring confusing or if you’re unsure about the red wire’s purpose, it’s always wise to seek professional help. Electricians are trained to handle these situations and can ensure a safe and proper installation.
Read too: A Step-by-Step Guide to Installing Rockwool Insulation in Your Ceiling: Unlock Energy Efficiency
Conclusion: Enjoying the Fruits of Your Labor
Ceiling fan installation, with a focus on the red wire, doesn’t have to be a puzzle. Armed with the right knowledge and tools, you can breeze through the process and enjoy the comfort and energy savings that a well-installed ceiling fan brings.
In conclusion, understanding the nuances of the red wire is key to a successful ceiling fan installation. By following the steps outlined in this guide, you’ll be well on your way to enjoying the benefits of a well-circulated and well-lit living space. So, roll up your sleeves, gather your tools, and let’s make your ceiling fan installation project a cool success!