Ceiling fans are a staple in many homes, providing both comfort and style. When installing or replacing a ceiling fan, one of the most common questions that arise involves the wiring, particularly the purpose and proper connection of the blue wire. This wire plays a crucial role in the operation of your ceiling fan, especially if it includes a light kit. In this comprehensive guide, we will explain everything you need to know about the blue wire on a ceiling fan, from its function to step-by-step instructions on how to connect it safely.
What Is the Blue Wire on a Ceiling Fan?
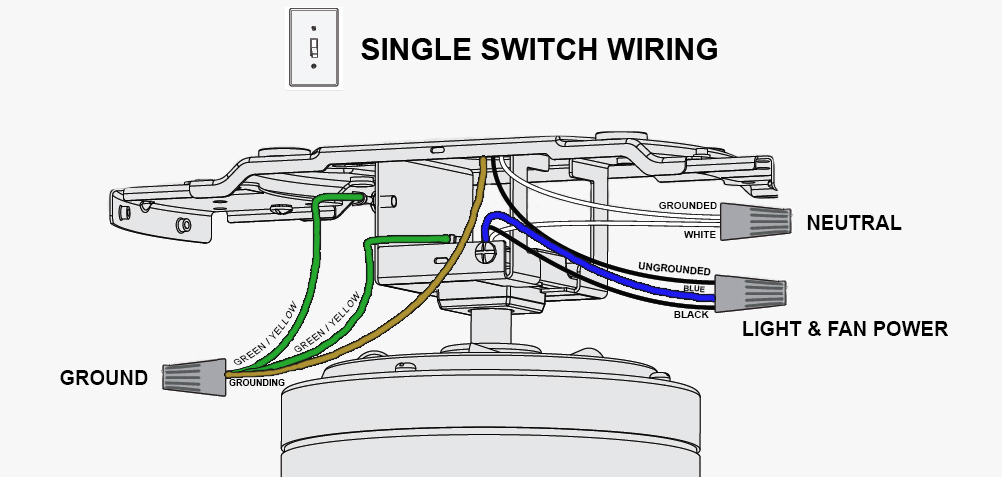
The blue wire on a ceiling fan is typically the wire that controls the fan’s light fixture. In most ceiling fans that come with a light kit, the blue wire is responsible for powering the light. Understanding the function of each wire in a ceiling fan is essential to ensure proper installation and to avoid any potential electrical issues.
Key Functions of the Blue Wire:
- Light Control: The blue wire connects to the light kit and is used to power the fan’s lights.
- Separate Control: It allows the fan and the light to be controlled independently, usually when using a wall switch with separate controls for the fan and the light.
Read too: Kitchen Lighting For A Vaulted Ceiling: Illuminating Your Space with Style and Functionality
Identifying the Blue Wire
Before you begin working with the wiring, it’s important to identify all the wires involved. Ceiling fans typically come with a few standard wires, each serving a different purpose:
- Black Wire: This is the main power wire for the fan motor.
- White Wire: This is the neutral wire.
- Green or Bare Wire: This is the ground wire.
- Blue Wire: This wire is specifically for the light kit, as mentioned earlier.
In some cases, you may also encounter a red wire, which is used for a second hot wire to control the light independently from the fan, depending on your switch setup.
How to Safely Connect the Blue Wire on a Ceiling Fan
Now that you understand the purpose of the blue wire, the next step is learning how to connect it correctly. Improper wiring can lead to the fan or lights not working, or worse, electrical hazards. Below is a step-by-step guide to help you through the process.
Step 1: Turn Off the Power
Before you begin any electrical work, ensure that the power is turned off at the circuit breaker. This is crucial to avoid any accidental shocks or injuries.
Step 2: Inspect the Wiring
Carefully examine the wires coming from the ceiling box. You should see several wires, including a black wire, white wire, green or bare wire, and the blue wire from the ceiling fan.
Step 3: Connect the Ground Wires
Start by connecting the ground wires. The ground wire from the ceiling (green or bare wire) should be connected to the green wire from the ceiling fan. This connection ensures that any stray electrical currents are safely grounded.
Step 4: Connect the White (Neutral) Wires
Next, connect the white wire from the ceiling box to the white wire from the ceiling fan. The white wire is the neutral wire, and this connection completes the circuit for both the fan and the light.
Step 5: Connect the Black (Fan Motor) Wires
The black wire from the ceiling should be connected to the black wire from the ceiling fan. This wire provides power to the fan motor, allowing the blades to spin.
Step 6: Connect the Blue (Light) Wire
Finally, connect the blue wire from the ceiling fan to the black (or sometimes red) wire from the ceiling box. This wire is responsible for powering the light kit on your ceiling fan.
Step 7: Secure the Connections
Once all the wires are connected, secure them with wire nuts and ensure that there are no exposed wires. You can use electrical tape to wrap the wire nuts for extra security.
Step 8: Attach the Fan to the Ceiling
Carefully lift the fan and attach it to the mounting bracket on the ceiling. Make sure that all wires are tucked safely into the ceiling box to avoid pinching.
Step 9: Restore Power and Test
After the fan is securely mounted, restore power at the circuit breaker and test the fan and light to ensure everything is working properly.
Common Issues with the Blue Wire on a Ceiling Fan
Even when you follow the instructions carefully, you might still encounter some issues with the blue wire on your ceiling fan. Here are some common problems and troubleshooting tips.
1. Light Doesn’t Turn On
If the light on your ceiling fan doesn’t turn on after installation, the problem could be with the connection of the blue wire. Double-check to ensure that the blue wire is connected to the correct wire from the ceiling box.
2. Fan and Light Are Not Controlled Separately
If your ceiling fan and light are not operating independently, the issue could be related to the wall switch. You may need to install a dual-switch system to control the fan and light separately.
3. Flickering Lights
Flickering lights can be caused by loose connections or incompatible bulbs. Make sure the connections are tight and use bulbs that are recommended for ceiling fans.
Enhancing Your Ceiling Fan with the Blue Wire
Understanding the role of the blue wire not only helps with installation but also allows you to enhance the functionality of your ceiling fan. Here are some ways you can make the most out of the blue wire:
1. Use a Remote Control
Many modern ceiling fans come with remote controls that allow you to manage the fan speed and light settings with ease. The blue wire is essential for enabling the light function via the remote.
2. Install a Wall Control
A wall control system can be installed to give you separate controls for the fan and the light. This system is especially useful if you prefer not to use a remote.
3. Upgrade Your Light Kit
If your ceiling fan doesn’t have a light kit or you want to upgrade it, understanding how to connect the blue wire will make the installation of a new light kit straightforward.
Conclusion
The blue wire on a ceiling fan is a crucial component for powering the light kit. Properly connecting this wire ensures that your fan and light operate as intended, whether you’re using a simple wall switch, a dual switch system, or a remote control. By following the steps outlined in this guide, you can confidently install or repair your ceiling fan, ensuring it brings both comfort and style to your home.